Howto adjust the Front Derailleur (FD)

Applies to most 3-chainring derailleur systems.

Make sure your Rear D (RD) is already setup as you will need to access all of your rear gears for this tutorial.

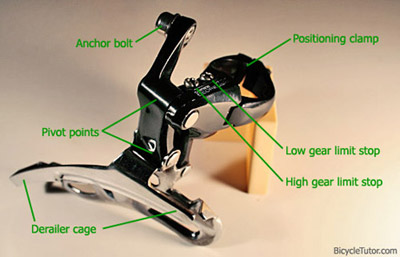
Front Derailleur Components

Front Derailleur

Height Adjustment

The first step is to adjust the derailleur’s height and angle using the positioning clamp that attaches the derailleur to your bike’s frame. This can be a bit tricky, since tightening the clamp’s bolt will set both height and angle at the same time. To make things easier, tighten the clamp so that it is secure, but loose enough to move it around with your hand.

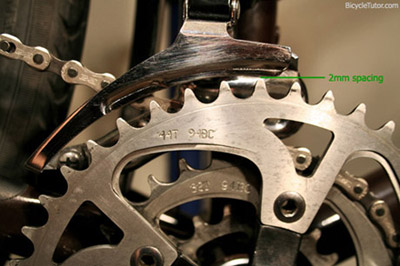
For correct height adjustment, position the bottom of the derailleur cage as close to the largest sprocket teeth as possible, so that it still clears. Manufacturers recommend a 2mm spacing, but this is only meant as a general guide and not a rule. The lower the cage is, the better it will shift. While you’re in this position, take a quick look at the curvature of the large chainring and the outer derailleur cage, to make sure no part of the cage is rubbing on the chainring.
Front Derailer and Chainring

Angle Adjustment

The derailleur angle is set by looking down from above. This can be tricky and requires some patience, as the shape of the derailleur cage is often not straight. You’ll want to imagine a centerline in the middle of the cage, which should line up with the center line of your frame. Once the angle is correct, you can completely tighten the positioning clamp.

Limit Screws

There are two gear limit screws. On older derailleurs the low-gear limit is closest to the frame, but some newer models have reversed the screw’s positioning.

Low Gear Limit

To adjust the low-gear limit, first make sure your chain is shifted to the largest sprocket in the rear, and the smallest sprocket in the front. The low-gear limit stop stops the derailleur from shifting past the smallest chainwheel and throwing the chain onto the bottom bracket shell. If it is too loose, the chain will fall off when you downshift to the small chainring. If it is too tight, it might not shift down at all. Ideally, you want to set up the inner plate so that it barely clears the chain in the lowest gear. However, triple chainrings like this one sometimes require a tiny bit of extra spacing.

High Gear Limit

To adjust the high-gear limit, shift the chain into your highest gear, that is, smallest sprocket in the rear, and the largest sprocket in the front. The high-gear limit prevents the chain from shifting past the largest chainwheel and throwing the chain out into your pedals. Ideally you want the cage to stop just after it clears the chain on the large chainring.

Shifting Adjustments

Now that both limit screws are set up, shift back to the largest sprocket in the rear, and the smallest in the front. Make sure your front shifter is in the lowest gear position, and pull the shift cable to eliminate any extra slack, before tightening the cable bolt.
Shift the front derailleur to the middle gear, and run through the entire range of rear sprockets to make sure the chain does not rub on either side of the front derailleur cage. If it does rub, you can adjust the trim by tweaking the barrel adjuster on your front shift lever. If you have an older friction shifter, often you will have to manually adjust the trim while riding.
This tutorial was based on the most common type of drivetrain, and assumes that you are using the components your derailleur was designed for. If you have a customized set of chainrings and/or derailleurs, you may need to try some different techniques, or even take your bike into a shop for further adjustment.

How to Remove & Install Pedal

Pedal  Basics
This article may come in handy. It has this easy to remember tip on left-hand and right-hand thread. Which spanner/wrench direction to loosen or tighten?
Just remember this:Push  toward the crankarm
To LOOSEN - make sure the spanner/wrench is turned towards the BACK of the bike. This applies to both left and right pedal!
To TIGHTEN - make sure the spanner/wrench is turned towards the FRONT of the bike! This applies to both left and right pedal!


Remove Bike Gear Cassette

IMG_2637

IMG_2631 IMG_2619 IMG_2621

Hand itchy so decided to remove the gear cassette for cleaning and did a little fine adjustment to the hub bearings. Wow, the grease still looks as good as new. For details on how to, here is a good link.

Measuring Chain Wear using a 12-Inch Ruler

Measuring Chain Wear by SheldonBrown
The standard way to measure chain wear is with a ruler or steel tape measure. This can be done without removing the chain from the bicycle. The normal technique is to measure a one-foot length, placing an inch mark of the ruler exactly in the middle of one rivet, then looking at the corresponding rivet 12 complete links away. On a new, unworn chain, this rivet will also line up exactly with an inch mark. With a worn chain, the rivet will be past the inch mark.
This gives a direct measurement of the wear to the chain, and an indirect measurement of the wear to the sprockets:
  • If the rivet is less than 1/16" past the mark, all is well.
  • If the rivet is 1/16" past the mark, you should replace the chain, but the sprockets are probably undamaged.
  • If the rivet is 1/8" past the mark, you have left it too long, and the sprockets (at least the favorite ones) will be too badly worn. If you replace a chain at the 1/8" point, without replacing the sprockets, it may run OK and not skip, but the worn sprockets will cause the new chain to wear much faster than it should, until it catches up with the wear state of the sprockets.
  • If the rivet is past the 1/8" mark, a new chain will almost certainly skip on the worn sprockets, especially the smaller ones.
Summary based on the above Sheldonbrown guide:
Stretch Recommendations
Less than 1/16” (<1.6mm) No need to replace the chain. Chain is fine.
1/16” (1.6mm) Replace NOW!
1/8” (3.2mm)
A bit late but still must replace the chain. Favourite gears already worn. New chain may wear out faster due to worn gears unless you also change the gears.
More than 1/8” (>3.2mm) Too late! New chain will skip on badly worn gears. Need new chain and new gears.

Below is how I measured mine:
1c
0b setting
no stretchb
1.6b
2mmb
3.2b
Remarks: I used a Vernier caliper to estimate the gap (wear).
For quick check, we can use the rivet as a guide. When the 12 inch line is almost touching the edge of the rivet, wear is probably between 1.6 to 2mm, time to replace chain.

Maintenance – Headset & BB Spindle

Hands itchy again. This time out came the Fork. Wiped clean, sprayed GT85  & applied grease to a few areas including the Fork’s steerer and headset bearings. Remember to put some grease on all screw threads before assembly.
Tools used: 5mm Allen key
… walau, realize the Fork is so heavy!
 3 1
2


Saw some rusting on the BB’s spindle. Had to remove the crank (crank-arm) to clean it.
Tools used: 8mm Allen key & Crank Extractor  
4
5

Dump the granny gear?

Vanity or crazy? or really forgot to put back, haha.

Itchy hands, wanted to clean the other side of BB spindle but end up dumping the white elephant front 22T granny. Never need it since day one. May need it if we climb Mt Faber but I guess a 32-32 should be good enough ba. Anyway can always put it back again.


1 2 3

4 5  6

Clean & Lube Your Brake and Derailleur Cables

Kena heavy rain or have you recently ‘hose down’ your bike? Better lube the cables to ensure we continue to enjoy smooth shifting and braking.

Derailleur (Shifting) Cables
  1. With bike on a stand, shift the chain to the ‘biggy’ rear and  ‘biggy’ front ring.

  2. Without pedaling, shift rear gear and front gear down to their smallest. The derailleurs and chain should remain where they are, but your cables should now have some slack.

  3. Pull the cable housing out from the cable stops.1a 1b 2a3

  4. Slide cable housing and wipe off any water on the cable with a clean rag.

    4
  5. Lube derailleur cables with light oil.

  6. Put the cable housing back into the cable stops and carefully turn the pedals forward.

Brake Cables
  1. Squeeze your brake levers so that the pads are touching the rim.

  2. Hold the brake pads against the rim with one hand.

  3. Pop the cable housing out from the cable stops.

  4. Slide cable housing and wipe off any water on the cables with a clean rag.

  5. Lube brake cables with oil (heavy oil recommended).

  6. Slide housing back, squeeze the brakes again and put the housing back in the cable stops.

  7. Test your brakes to make sure they're safe.

Hubs – Too tight too loose?

parts-of-a-bicycle-hub-2

That day Johnny told me his rear wheel is shaky. Yes looks like a loose hub. I noticed mine was slightly loosen after the Kota Tinggi trip and tightened it immediately but forgot to warn you guys to check. Mine wasn't as loose as Johnny’s though.

parts-of-a-bicycle-hub

So how tight how loose? No play good to go, but over tightened hubs mean more resistance and faster bearing and cup wear. I tightened mine just to the point where they have no play. Some like to leave a hairline gap. Always check again when the wheel is tightened to the frame for any rubbing and ensure no play. If in doubt, remove wheel to check and readjust. Repeat this until you get that sweet touch, you’ll need to have a little patience here.

Loose hub: Axle turns smoothly but moving the axle back and forth result in a knocking feeling. Sometimes the easiest way to check for play is with the wheel still on the bike. Hold the bike off the ground and try to move the wheel side to side feeling for any knocking. Rotate the wheel half a rotation and try it again. If there is nothing that means the hub is fine or too tight. You will have to remove the wheel in order to determine how tight it is.

Tight hub: When you turn the axle, you’ll feel rubbing friction, almost like notches, that means the hub is way too tight!


tightening-bicycle-hubThe process of actually loosening or tightening the hub is fairly straight forward. You need thin wrenches to access the thin nuts on the wheel.  Each side has two nuts. The inner cone nut puts pressure directly on the bearing while the outer is a lock-nut. To loosen or tighten the hub you will need to loosen the outer lock-nut on one side of the hub first. Pick a side, put one wrench on the inner, one on the outer and loosen. Now you can loosen or tighten the inner cone nut to change the pressure on the bearings. When you’re finished adjusting the pressure, tighten the outer lock nut back down while using a wrench to make sure the inner cone nut does not turned together as well. If you do not do this you can end up tightening the hub.

That’s it!

Rear Derailer Adjustment

RD

‘B-Tension’ Screw

B-Tension B-Tension screw controls the tension of the upper pivot spring. Loosening this screw (turn anti-clockwise) brings the guide pulley closer to the gears thus better shifting. But we dun want it to be too near until the pulley knock against the largest rear gear causing noise and maybe shifting problems.  Check/ adjust this when the chain is set at biggest rear gear and smallest front chain ring. Usually we’ll only need to adjust this tension when we change the chain length or size of rear gear.


Limit Stop Screws

These 2 screws set the travel limits, how far the derailer can move from left to right (biggest and smallest gear position). Basically we want to set the limit stop screws so that the chain does not over shift out towards the spokes or get stuck between the small sprocket and dropout. This can be done by aligning the guide pulleys to the sprockets.

Normally, this is done only when a new derailer is installed or when you change to a different rear cassette. Note: can be used as a temporary field fix for a bent deraileur.

Low Gear limit stop

RD limit low


High Gear limit stop

RD limit high 


Shifting Adjustment (one click one gear shift)

The click-stops that provide indexing are in the shifters. It sets the length of the cable so that the derailer moves to the correct position/gear to correspond with each shifter click. If a derailer is correctly adjusted when it is installed, this is the only adjustment that should have to be fine tuned overtime to accommodate cable stretch, or when cables are replaced.

Fine adjustment of the indexing can be done using the adjusting barrel located at one end of a length of cable housing. There is also another index adjuster at the shifter itself, just where the cable exits. This allows the rider to do fine adjustment when on the move. Enough bla bla bla …. so how to fine tune.

  1. First start with shifter at home position and chain on the smallest gear. Always start adjustment from the small rear gear and big front chain ring.

  2. Click the shifter to the first click after the fully loose home position, then turn the pedals forward. The chain should shift to the second smallest gear. If it doesn't, it means the cable is too loose.

  3. Turn adjusting barrel counter-clockwise (CCW) to tighten the cable. Start with half a turn, then check again. Repeat until it moves up to 2nd gear.

  4. If derailleur fails to shift to next gear after several rounds of the barrel, inner wire may be too slack. Turn barrel adjuster (CW) fully into derailleur body then turn counter clockwise two turns to allow for index adjustments. Loosen inner wire anchor bolt and gently pull on inner wire with a plier to remove slack. Tighten inner wire anchor bolt.

  5. After it moves up to the 2nd gear, turn the pedal slowly, observe and listen. Chain may be jumping on the gears at this stage if the cable is still not tight enough (same if over tension). Give it another 1/4 CCW turn a time to stop the jumping. You should hear chain rubbing tick tick noise. Tighten cable until the noise is gone. Continue to tighten 1/4 CCW turn until you get a over-tighten noise.

  6. Once the too-tight noise is achieved, turn barrel adjuster 1/4 turn clockwise, to release wire tension, and pedal again to check for no tick tick noise. Continue turning barrel adjuster 1/4 turn clockwise until the noise stops.Viola!

    no sound


  • Click shifter back and forth between home and 2nd gear while slow spinning the pedal to check for smooth up and down shifting. When you’ve got it right, the rest of the gears should also shift smoothly. Shift lever to change gears, and check that no noise occurs in any of the gear positions.
  • If you think you’ve way over tighten or totally mess it up, no worry. Just start over. Remember to shift to smallest gear and set the barrel adjuster to a neutral position (turn barrel clockwise all the way in and back up 2 rounds to give some allowance) before you start over. Unless your cable tension is totally messed up i.e. out of range using the barrel adjuster, we dun need to touch the anchor bolt in step#4 above.
  • Fine adjustments are accomplished according to the following principles:

    • Shifting from small to larger sprockets is accomplished by tightening the cable; if such shifts are slow, the cable is not tight enough--turn the barrel counterclockwise to tighten it.

    • Shifting from big to smaller sprockets is accomplished by loosening the cable; if such shifts are too slow, the cable is not loose enough--turn the barrel clockwise to loosen it.

    If the rear indexing works properly when using the large chain ring but not on the small chain ring, or vice-versa, this is often a sign that the rear derailer hanger is bent.

NOTE: Here assumes that there are no unusual problems, such as bent derailleurs,  or excess inner wire friction from dirt in the housing, or modified components.


Adapted from various online resource. Source1


Afternote:

1. Tuning done but only the 7th gear is having noise. What do I do now?

This may not be the right way but it works for me:

Check if cable needs more tightening: At the 7th gear noisy position, spin pedal slowly. To simulate cable tightening, lightly finger press the RD inwards, or lightly finger pull the exposed inner cable  along the top tube. I prefer the finger pressing more because I get to feel the rubbing when cable is over tighten.

- If noise disappear, cable needs more tightening. Turn Barrel 1/4  CCW until noise disappear.

- If you get more rattling and noise, cable needs loosening. Turn Barrel 1/4 CW until noise disappear.

Run thru all the gears again and re-adjust if required. Good luck and have fun.

Post mortem : Axle Broken

(Picture for illustration only, not the actual part)

axle crackpthubparts

The bicycle axle is a critical component that must endure high repeated cyclic loads especially from imperfections on the road.

Fatigue is when a motion is repeated, the object that is doing the work becomes weak. Just like cycling, our legs become slow and weak after a while. Same principle for materials. Fatigue occurs when a material is subject to alternating stresses, over a long period of time. The axle holds our body and bike weight. When we pedal, the chain tension loading and road shock/ vibration put lots of stress on the axle especially at the inner side of the right bearing cone (cassette/gear side). This location according to some veteran is where axles usually "bend" as they crack.


Initial symptom: Shaky rear wheel

Initial suspect: Loose hub – cone nut came loose due to terrible road imperfection/ vibration from KT ride.

Action taken/ Observations:

Removed Quick-Release skewer and rear wheel from the bike.

- Finger able to rock the hollow hub’s axle side to side (approx 3-5 mm)

- Left (non-drive) lock nut was already loosen. Able to turn nut with fingers.

Attempt to adjust loose axle : 

- Finger-tighten, turned in cone nut to touch bearings.

   Axle still rock side to side. No significant improvement especially on drive side.

- Clean bearings and applied grease on non-drive side

- Adjusted cone & tightened non-drive lock nut. Drive side still rocking.

- Tried to remove cone and lock nuts on drive side to check for missing steel balls.

=> Top half of the axle just came off with just a little loosening force applied on the lock nut. The axle broke along the threaded section on the inner side of the right bearing cone as shown on the picture above.


Possible causes:

Each thread valley is a stress concentrator, repeated cyclic stresses over many km, over a long period of time, the axle can fatigue at one of the thread valley and a crack may begin to propagate through the axle. It is most likely that the terrible vibration caused by the ‘rough’ KT road escalated the crack propagation.

The fracture surface if I remember correctly, half or more is smooth. Smooth fracture surface is a result of continuous rubbing of the crack as it grows. The crack appears to have propagated to about half or more of the axle diameter thus the possible side to side rocking. The smaller rough fracture surface is the breakage point possibly from the twisting force used to loosen the lock nut.


My thoughts:

Next time before and especially after a rough ride, make sure check for no shaky wheels among other things. Lucky the axle lasted all the way home, or else jialat. Possibly the quick-release skewer that goes thru the hollow axle was all the while helping to hold the axle together … axle compression when we tighten the wheel, skewer rod inside the hollow axle holding it straight… until when we removed the wheel and pulled the skewer rod out of the hollow axle … all hell broke loose!

Cleaning SPD Cleats

When was the last time you remove your cleats for cleaning? I didn't want to mess with mine cos it took me many rides to get to this sweat spot.

But hands was too itchy .. so ‘tiak la’… wow, look at those dirt/sand!!!

Remember to trace out cleat position first with a white marker before removal. Also take note of the plate with 2 holes … its lateral position before removing screws.

IMG_2882 IMG_2891

IMG_2898 IMG_2888

Clean-Dry-Spray GT85. Remember to lightly grease screw threads before assembly.

Cleaning Hub


Just some old photo … Clean axle, cone, fasteners, bearing races & steel balls then pack grease generously. Wipe away excess that ooze out after tightening.

IMG_2899

IMG_2901-1 IMG_2902  IMG_2912-1IMG_2914  IMG_2913-1      IMG_2916-1 IMG_2917-1

02102010068