Showing posts with label Adjustment. Show all posts

Howto adjust the Front Derailleur (FD)

Applies to most 3-chainring derailleur systems.

Make sure your Rear D (RD) is already setup as you will need to access all of your rear gears for this tutorial.

Front Derailleur Components
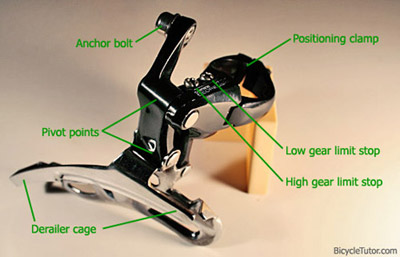
Front Derailleur

Height Adjustment

The first step is to adjust the derailleur’s height and angle using the positioning clamp that attaches the derailleur to your bike’s frame. This can be a bit tricky, since tightening the clamp’s bolt will set both height and angle at the same time. To make things easier, tighten the clamp so that it is secure, but loose enough to move it around with your hand.

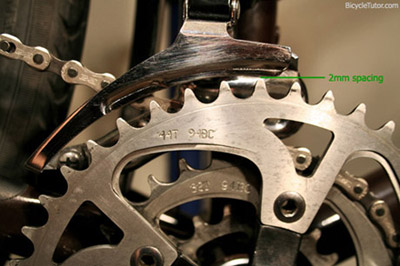
For correct height adjustment, position the bottom of the derailleur cage as close to the largest sprocket teeth as possible, so that it still clears. Manufacturers recommend a 2mm spacing, but this is only meant as a general guide and not a rule. The lower the cage is, the better it will shift. While you’re in this position, take a quick look at the curvature of the large chainring and the outer derailleur cage, to make sure no part of the cage is rubbing on the chainring.
Front Derailer and Chainring

Angle Adjustment

The derailleur angle is set by looking down from above. This can be tricky and requires some patience, as the shape of the derailleur cage is often not straight. You’ll want to imagine a centerline in the middle of the cage, which should line up with the center line of your frame. Once the angle is correct, you can completely tighten the positioning clamp.

Limit Screws

There are two gear limit screws. On older derailleurs the low-gear limit is closest to the frame, but some newer models have reversed the screw’s positioning.

Low Gear Limit

To adjust the low-gear limit, first make sure your chain is shifted to the largest sprocket in the rear, and the smallest sprocket in the front. The low-gear limit stop stops the derailleur from shifting past the smallest chainwheel and throwing the chain onto the bottom bracket shell. If it is too loose, the chain will fall off when you downshift to the small chainring. If it is too tight, it might not shift down at all. Ideally, you want to set up the inner plate so that it barely clears the chain in the lowest gear. However, triple chainrings like this one sometimes require a tiny bit of extra spacing.

High Gear Limit

To adjust the high-gear limit, shift the chain into your highest gear, that is, smallest sprocket in the rear, and the largest sprocket in the front. The high-gear limit prevents the chain from shifting past the largest chainwheel and throwing the chain out into your pedals. Ideally you want the cage to stop just after it clears the chain on the large chainring.

Shifting Adjustments

Now that both limit screws are set up, shift back to the largest sprocket in the rear, and the smallest in the front. Make sure your front shifter is in the lowest gear position, and pull the shift cable to eliminate any extra slack, before tightening the cable bolt.
Shift the front derailleur to the middle gear, and run through the entire range of rear sprockets to make sure the chain does not rub on either side of the front derailleur cage. If it does rub, you can adjust the trim by tweaking the barrel adjuster on your front shift lever. If you have an older friction shifter, often you will have to manually adjust the trim while riding.
This tutorial was based on the most common type of drivetrain, and assumes that you are using the components your derailleur was designed for. If you have a customized set of chainrings and/or derailleurs, you may need to try some different techniques, or even take your bike into a shop for further adjustment.

Hubs – Too tight too loose?

parts-of-a-bicycle-hub-2

That day Johnny told me his rear wheel is shaky. Yes looks like a loose hub. I noticed mine was slightly loosen after the Kota Tinggi trip and tightened it immediately but forgot to warn you guys to check. Mine wasn't as loose as Johnny’s though.

parts-of-a-bicycle-hub

So how tight how loose? No play good to go, but over tightened hubs mean more resistance and faster bearing and cup wear. I tightened mine just to the point where they have no play. Some like to leave a hairline gap. Always check again when the wheel is tightened to the frame for any rubbing and ensure no play. If in doubt, remove wheel to check and readjust. Repeat this until you get that sweet touch, you’ll need to have a little patience here.

Loose hub: Axle turns smoothly but moving the axle back and forth result in a knocking feeling. Sometimes the easiest way to check for play is with the wheel still on the bike. Hold the bike off the ground and try to move the wheel side to side feeling for any knocking. Rotate the wheel half a rotation and try it again. If there is nothing that means the hub is fine or too tight. You will have to remove the wheel in order to determine how tight it is.

Tight hub: When you turn the axle, you’ll feel rubbing friction, almost like notches, that means the hub is way too tight!


tightening-bicycle-hubThe process of actually loosening or tightening the hub is fairly straight forward. You need thin wrenches to access the thin nuts on the wheel.  Each side has two nuts. The inner cone nut puts pressure directly on the bearing while the outer is a lock-nut. To loosen or tighten the hub you will need to loosen the outer lock-nut on one side of the hub first. Pick a side, put one wrench on the inner, one on the outer and loosen. Now you can loosen or tighten the inner cone nut to change the pressure on the bearings. When you’re finished adjusting the pressure, tighten the outer lock nut back down while using a wrench to make sure the inner cone nut does not turned together as well. If you do not do this you can end up tightening the hub.

That’s it!

Rear Derailer Adjustment

RD

‘B-Tension’ Screw

B-Tension B-Tension screw controls the tension of the upper pivot spring. Loosening this screw (turn anti-clockwise) brings the guide pulley closer to the gears thus better shifting. But we dun want it to be too near until the pulley knock against the largest rear gear causing noise and maybe shifting problems.  Check/ adjust this when the chain is set at biggest rear gear and smallest front chain ring. Usually we’ll only need to adjust this tension when we change the chain length or size of rear gear.


Limit Stop Screws

These 2 screws set the travel limits, how far the derailer can move from left to right (biggest and smallest gear position). Basically we want to set the limit stop screws so that the chain does not over shift out towards the spokes or get stuck between the small sprocket and dropout. This can be done by aligning the guide pulleys to the sprockets.

Normally, this is done only when a new derailer is installed or when you change to a different rear cassette. Note: can be used as a temporary field fix for a bent deraileur.

Low Gear limit stop

RD limit low


High Gear limit stop

RD limit high 


Shifting Adjustment (one click one gear shift)

The click-stops that provide indexing are in the shifters. It sets the length of the cable so that the derailer moves to the correct position/gear to correspond with each shifter click. If a derailer is correctly adjusted when it is installed, this is the only adjustment that should have to be fine tuned overtime to accommodate cable stretch, or when cables are replaced.

Fine adjustment of the indexing can be done using the adjusting barrel located at one end of a length of cable housing. There is also another index adjuster at the shifter itself, just where the cable exits. This allows the rider to do fine adjustment when on the move. Enough bla bla bla …. so how to fine tune.

  1. First start with shifter at home position and chain on the smallest gear. Always start adjustment from the small rear gear and big front chain ring.

  2. Click the shifter to the first click after the fully loose home position, then turn the pedals forward. The chain should shift to the second smallest gear. If it doesn't, it means the cable is too loose.

  3. Turn adjusting barrel counter-clockwise (CCW) to tighten the cable. Start with half a turn, then check again. Repeat until it moves up to 2nd gear.

  4. If derailleur fails to shift to next gear after several rounds of the barrel, inner wire may be too slack. Turn barrel adjuster (CW) fully into derailleur body then turn counter clockwise two turns to allow for index adjustments. Loosen inner wire anchor bolt and gently pull on inner wire with a plier to remove slack. Tighten inner wire anchor bolt.

  5. After it moves up to the 2nd gear, turn the pedal slowly, observe and listen. Chain may be jumping on the gears at this stage if the cable is still not tight enough (same if over tension). Give it another 1/4 CCW turn a time to stop the jumping. You should hear chain rubbing tick tick noise. Tighten cable until the noise is gone. Continue to tighten 1/4 CCW turn until you get a over-tighten noise.

  6. Once the too-tight noise is achieved, turn barrel adjuster 1/4 turn clockwise, to release wire tension, and pedal again to check for no tick tick noise. Continue turning barrel adjuster 1/4 turn clockwise until the noise stops.Viola!

    no sound


  • Click shifter back and forth between home and 2nd gear while slow spinning the pedal to check for smooth up and down shifting. When you’ve got it right, the rest of the gears should also shift smoothly. Shift lever to change gears, and check that no noise occurs in any of the gear positions.
  • If you think you’ve way over tighten or totally mess it up, no worry. Just start over. Remember to shift to smallest gear and set the barrel adjuster to a neutral position (turn barrel clockwise all the way in and back up 2 rounds to give some allowance) before you start over. Unless your cable tension is totally messed up i.e. out of range using the barrel adjuster, we dun need to touch the anchor bolt in step#4 above.
  • Fine adjustments are accomplished according to the following principles:

    • Shifting from small to larger sprockets is accomplished by tightening the cable; if such shifts are slow, the cable is not tight enough--turn the barrel counterclockwise to tighten it.

    • Shifting from big to smaller sprockets is accomplished by loosening the cable; if such shifts are too slow, the cable is not loose enough--turn the barrel clockwise to loosen it.

    If the rear indexing works properly when using the large chain ring but not on the small chain ring, or vice-versa, this is often a sign that the rear derailer hanger is bent.

NOTE: Here assumes that there are no unusual problems, such as bent derailleurs,  or excess inner wire friction from dirt in the housing, or modified components.


Adapted from various online resource. Source1


Afternote:

1. Tuning done but only the 7th gear is having noise. What do I do now?

This may not be the right way but it works for me:

Check if cable needs more tightening: At the 7th gear noisy position, spin pedal slowly. To simulate cable tightening, lightly finger press the RD inwards, or lightly finger pull the exposed inner cable  along the top tube. I prefer the finger pressing more because I get to feel the rubbing when cable is over tighten.

- If noise disappear, cable needs more tightening. Turn Barrel 1/4  CCW until noise disappear.

- If you get more rattling and noise, cable needs loosening. Turn Barrel 1/4 CW until noise disappear.

Run thru all the gears again and re-adjust if required. Good luck and have fun.