Make sure your Rear D (RD) is already setup as you will need to access all of your rear gears for this tutorial.
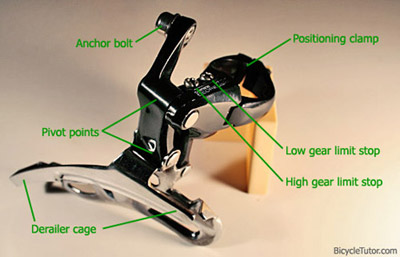
Front Derailleur Components

Height Adjustment
The first step is to adjust the derailleur’s height and angle using the positioning clamp that attaches the derailleur to your bike’s frame. This can be a bit tricky, since tightening the clamp’s bolt will set both height and angle at the same time. To make things easier, tighten the clamp so that it is secure, but loose enough to move it around with your hand.
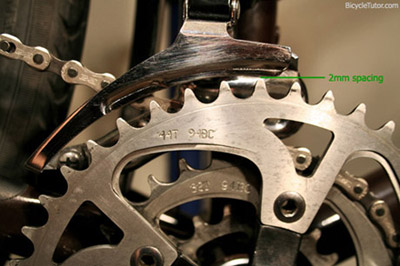
For correct height adjustment, position the bottom of the derailleur cage as close to the largest sprocket teeth as possible, so that it still clears. Manufacturers recommend a 2mm spacing, but this is only meant as a general guide and not a rule. The lower the cage is, the better it will shift. While you’re in this position, take a quick look at the curvature of the large chainring and the outer derailleur cage, to make sure no part of the cage is rubbing on the chainring.
For correct height adjustment, position the bottom of the derailleur cage as close to the largest sprocket teeth as possible, so that it still clears. Manufacturers recommend a 2mm spacing, but this is only meant as a general guide and not a rule. The lower the cage is, the better it will shift. While you’re in this position, take a quick look at the curvature of the large chainring and the outer derailleur cage, to make sure no part of the cage is rubbing on the chainring.
Angle Adjustment
The derailleur angle is set by looking down from above. This can be tricky and requires some patience, as the shape of the derailleur cage is often not straight. You’ll want to imagine a centerline in the middle of the cage, which should line up with the center line of your frame. Once the angle is correct, you can completely tighten the positioning clamp.
Limit Screws
There are two gear limit screws. On older derailleurs the low-gear limit is closest to the frame, but some newer models have reversed the screw’s positioning.
Low Gear Limit
To adjust the low-gear limit, first make sure your chain is shifted to the largest sprocket in the rear, and the smallest sprocket in the front. The low-gear limit stop stops the derailleur from shifting past the smallest chainwheel and throwing the chain onto the bottom bracket shell. If it is too loose, the chain will fall off when you downshift to the small chainring. If it is too tight, it might not shift down at all. Ideally, you want to set up the inner plate so that it barely clears the chain in the lowest gear. However, triple chainrings like this one sometimes require a tiny bit of extra spacing.
High Gear Limit
To adjust the high-gear limit, shift the chain into your highest gear, that is, smallest sprocket in the rear, and the largest sprocket in the front. The high-gear limit prevents the chain from shifting past the largest chainwheel and throwing the chain out into your pedals. Ideally you want the cage to stop just after it clears the chain on the large chainring.
Shifting Adjustments
Now that both limit screws are set up, shift back to the largest sprocket in the rear, and the smallest in the front. Make sure your front shifter is in the lowest gear position, and pull the shift cable to eliminate any extra slack, before tightening the cable bolt.
Shift the front derailleur to the middle gear, and run through the entire range of rear sprockets to make sure the chain does not rub on either side of the front derailleur cage. If it does rub, you can adjust the trim by tweaking the barrel adjuster on your front shift lever. If you have an older friction shifter, often you will have to manually adjust the trim while riding.
This tutorial was based on the most common type of drivetrain, and assumes that you are using the components your derailleur was designed for. If you have a customized set of chainrings and/or derailleurs, you may need to try some different techniques, or even take your bike into a shop for further adjustment.

No comments:
Post a Comment